
Software
2022-12-27
Creating "Apsitvarkom"

Introduction
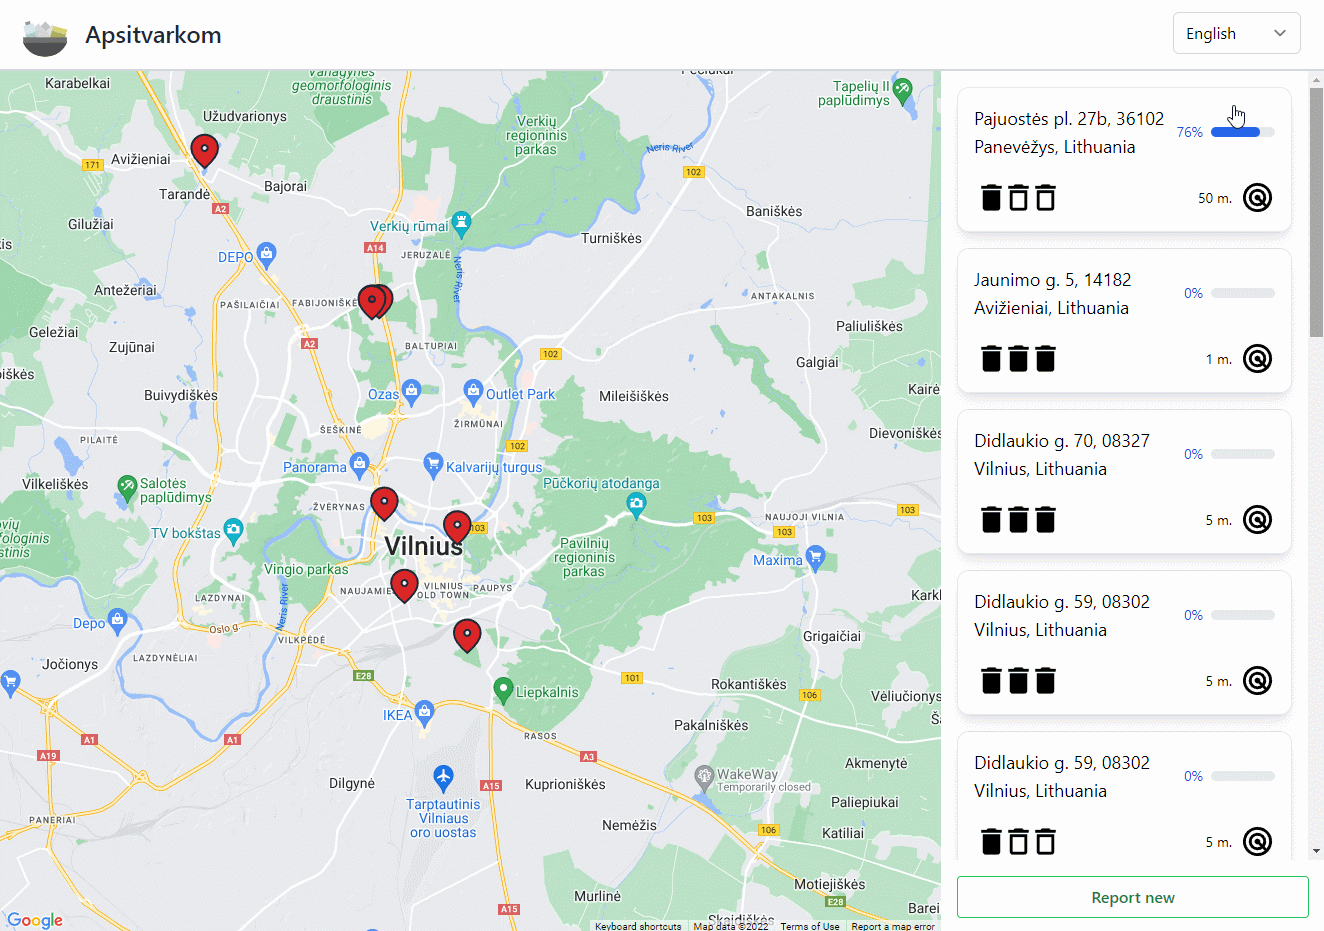
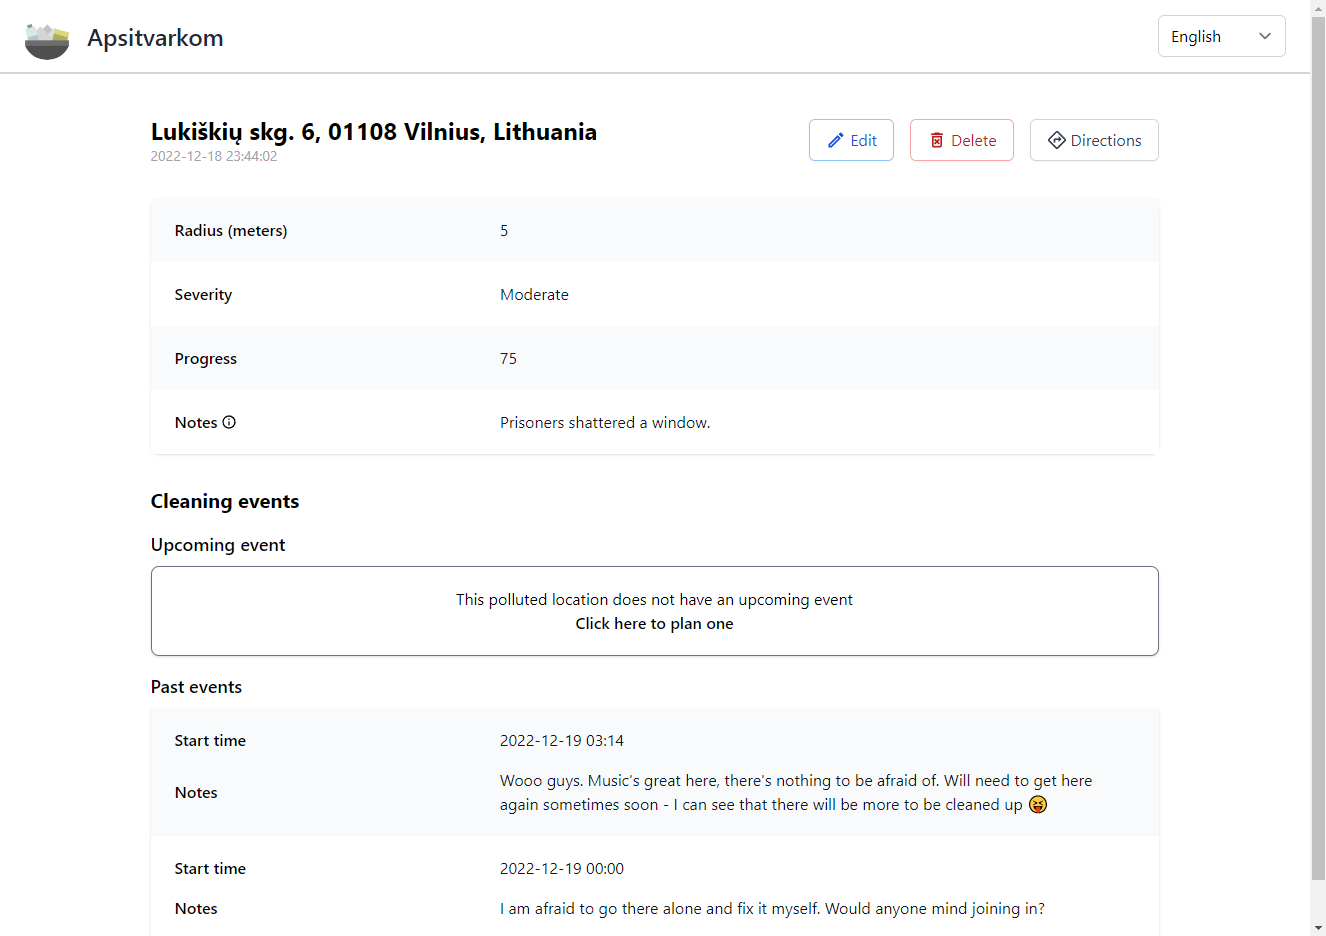
"Apsitvarkom" (Eng. "Let's clean up") is a web application that helps people track polluted locations and create cleaning events. This application has no monetary incentive for the users and relies on people doing good deeds to clean the environment around them. Users are presented with a map where they can report new polluted locations or view details (including the cleaning events) about existing ones.
This application was made as a university project (thanks to Šarūnas Griškus, Vilius Bakutis and Domas Dragūnas).
You can check out the source code on GitHub.
Front end
For our front end part of the application, we chose to create a React SPA mainly because I already had experience with it prior and since React has a big community, it offers a lot of documentation and material for getting started or when you're eventually stuck.
Styling
All of the styling on the front end is using tailwindcss. Main things we looked out for:
- Minimalistic and clean design
- Icons provided by react-icons
- Custom components (in hindsight, we could've even utilized headlessui to save time by not building some components from scratch)
- Mobile responsiveness
- Loading animations for some components
Map
The main interactive component is the map which is provided by Google Maps JavaScript API. However, we are not communicating with it directly but rather through @react-google-maps/api which makes it more convenient since we're using React. Do note that to use any of the Google Maps functionality, you need to do that through Google Maps Platform (which is a part of Google Cloud Platform).
Routing
The front end does have some routing using React Router, however, we needed only two routes:
/– main dashboard with the map and polluted location list./location/<id>– a page for each reported polluted location to view its data.
Do note that when serving your React application, the web server has to take into account these different routes and serve the same html file (since this is just a front end routing).
Internationalization
We also wanted to support multiple languages. This was achieved with react-i18next. Using i18next-parser, we can automatically extract messages to .json files from our source code and keep track of the translations more conveniently.
Validation
In my experience, relying on in-built HTML form validation is not that great, so we've built a basic validation system where we can create custom validation functions and use them in our forms with custom styling.
Back end
For our back end part of the application, we chose to create a RESTful API with .NET since this was required for our project and we also had the most experience with it.
Database
We are using PostgreSQL together with EF Core. EF Core was a requirement for the project but it turned out pretty useful for us in the long run. We are setting up the EF Core model (including validation/constraints) through fluent API. In the codebase, we use the repository pattern for services which need to interact with the database. This helps to keep two different layers/concerns separated and allows easier testing.
Data transfer objects
We faced quite a few obstacles when trying to come up with a schema/contract for our API. What we settled on, in the end, are these request/response models which (most of the time) are used for a single endpoint. For example, when POSTing a new polluted location, we expect a PollutedLocationCreateRequest and return a PollutedLocationResponse. We do not perform any business logic on these request/response models and instead, we first map them into/from "business" models (e.g. PollutedLocation) using AutoMapper (yes, it's pretty controversial, but it worked out fine for us).
Validation
Instead of using in-built data annotation validation, we chose to go with FluentValidation as it allows more complex validation rules (following the same mindset we had for front end validation). Of course, we wanted Swagger to reflect those rules as well, so we utilized MicroElements.Swashbuckle.FluentValidation to get support for basic validation rules automatically.
Reverse geocoding
You might have noticed that when reporting a new polluted location you do not need to input a title. This is because for each new polluted location we are querying the Google Maps Geocoding API which allows us to reverse geocode a location (assign a more human readable title from coordinates). It accepts a language parameter, so we're also doing this for the same list of languages that we support on the front end.
Deployment
Having our application deployed and utilizing CI/CD meant increased productivity for us and easier tracking of current progress.
Google Cloud
For deployment, we chose Google Cloud Platform (GCP) mainly because I had some experience with it and because of its Free Tier that pretty much fit all of our needs.
- Both front end and back end applications are containerized. Their images are stored in Artifact Registry.
- Services run on Cloud Run. It's serverless and very convenient to use. We just give it a Docker image and it automatically handles everything we need (e. g. scaling, TLS termination) and gives us a URL to reach the service.
- Our database runs on a dedicated VM on Compute Engine. This might seem a bit strange since Google Cloud has Cloud SQL, however (as of writing this) it is not a part of Free Tier. We reach this VM from the Cloud Run service through the Internet, since you would need a connector to reach it without going out of Google's network which would require another VM (out of Free Tier limits).
- We use Terraform to handle the needed infrastructure.
Pricing
For our usage, thanks to the previously mentioned Free Tier we ended up paying just a couple of cents due to some mishaps with network egress.
Google Maps Platform has its own pricing, but (as of writing this) it offers 200$ each month for all users, so we were well within the limit.
GitHub Actions
All of our repositories are located in GitHub so it makes sense to use GitHub Actions. These workflows allowed us to iterate more quickly and locate bad code faster.
Services have:
- PR workflow
- Builds
- Tests
- Reports code coverage
stagingbranch workflow:- Builds and tests the application
- Builds and pushes the Docker image
- Deploys the new image to Cloud Run
The infrastructure repository has:
- PR workflow
- Reports the
terraform planof the PR
- Reports the
mainbranch workflow- Runs
terraform apply
- Runs
Things not implemented
Last but not least, it's worth mentioning at least one thing that we did not implement. Authentication would be crucial to use this application in real life, however, due to time constraints we had to focus on other features.